
By this point, you’ve ordered the parts, assembled your Raspberry Pi, and installed Raspbian. Good job! Now you need to tweak the Raspbian operating system’s initial state to meet your needs.
Configuration Tool
When you start your Pi, the video display shows the output from each of the start-up scripts (as lots of scrolling text). If starting for the first time using a new image, you will be logged in as a root user, and the “raspi-config” menu will then appear.
(This is the layout from the Raspian 01-07-2014 image. It may be slightly different on other versions):
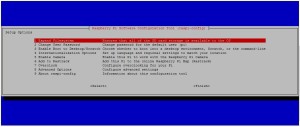
Overscan settings
Select “Advanced Options” and press enter. On the next page select “overscan” and press Enter. If there are black bars around the edge of your screen, select “<Disable>”. If there are not black bars around the edge of your screen, select “<Enable>”. Press Enter and you’ll be taken back to the main menu.
Changing Password
Select “Change User Password” and press Enter. Follow the prompts to set the password for the account ‘Pi’.
Keyboard, Local and Timezone settings
Select “Internationalisation Options” and press Enter. Follow the prompts to set your Local, Timezone and Keyboard Layout.
Boot Environment settings
Select “Enable Boot to Desktop/Scratch” and press Enter. Select Desktop log in and press Enter. you can select console if you do not want to boot directly into the Raspbian GUI. DO NOT SELECT SCRATCH PROGRAMMING ENVIRONMENT.
Select “Finish”. The Raspberry Pi will boot to the Raspbian desktop.
Set Your Display Rotation and Resolution
RaspberryPints is built around the notion of a vertical display; that is, a monitor turned to the portrait orientation. While it is not required, many more beers can fit on a display rotated to portrait.
On the desktop, double-click the LX Terminal icon. Depending on your screen size, it may take a few seconds to load.
Type the following, then press enter:
[nbox type=”notice”]sudo nano /boot/config.txt[/nbox]
If you turned your monitor 90º clockwise, scroll to the bottom and add the following line:
[nbox type=”notice”]display_rotate=3[/nbox]
If you turned your monitor 90º counter-clockwise, scroll to the bottom and add the following line:
[nbox type=”notice”]display_rotate=1[/nbox]
Scroll up and down. Look for two lines similar to:
[nbox type=”notice”]hdmi_group=1
hdmi_mode=2[/nbox]
These two lines need to be modified to reflect the maximum resolution of your display. Ensure they do not start with a ‘#’, as this symbol tells Raspbian to ignore the line. Some common resolutions are as follows.
For 1920 x 1080 monitor or 1080p TV:
[nbox type=”success”]hdmi_group=1
hdmi_mode=16[/nbox]
For 1280 x 720 monitor or 720p TV:
[nbox type=”success”]hdmi_group=1
hdmi_mode=4[/nbox]
For 1600 x 1200 monitor:
[nbox type=”success”]hdmi_group=1
hdmi_mode=2[/nbox]
For 1680 x 1050 monitor:
[nbox type=”success”]hdmi_group=2
hdmi_mode=51[/nbox]
For 1920 x 1200 monitor:
[nbox type=”success”]hdmi_group=2
hdmi_mode=68[/nbox]
For any other sizes, refer to the RPiconfig documentation.
Changes will not take affect until we save and reboot.
To save, press ‘Ctrl+O’ (WriteOut), then press ‘Enter’ when asked to confirm the filename.
To exit, press ‘Ctrl+X’ (Exit).
You should have been returned to the prompt. Type:
[nbox type=”notice”]sudo reboot[/nbox]
You should see:
[nbox type=”notice]The system is going down for reboot NOW!1 (pts/0)[/nbox]
Congratulations, you just gave your first Linux commands!
While it’s rebooting, lets learn a little bit about Linux. Almost all Linux/Unix operating systems (such as this one) do not provide feedback after a successful command is issued. This is because they were imagined in a time when printing a single character to the screen took a meaningful amount of time — seconds, even! To save wait time, you were provided a prompt to run your next command (in Raspbian, it’s $). This convention stuck and has remained over the years.
When the OS encounters problems executing your commands, you will be given a message stating what the error was. If seeking help, writing down verbatim or taking a picture of these errors is extremely useful.
Lastly, should you find yourself stuck in a command that you do not know how to escape from, you can cancel any command using Ctrl+C. This usually happens when a user accidentally ends a command with a single quotation mark (‘), telling the OS they want to issue a multi-line command. Similarly, you can exit most programs using Ctrl+X.
Set Up the WiFi Connection
There are a few ways to do this, but we’ll explain the easiest using the graphical interface.
The Pi should have booted to the Raspbian desktop. Sometimes this isn’t the case. If the graphical interface is not open, start it with the following command:
[nbox type=”notice”]startx[/nbox]
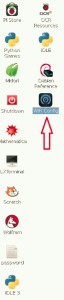
Click on the WiFi Config Icon. You icon could be in a different location on the screen, but the icon will be the same.
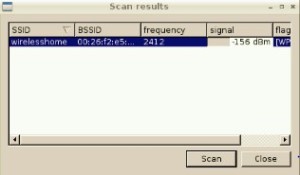
Once the following screen opens, click “Scan”.
Double click your network in the “Scan” dialog.
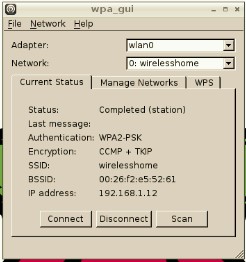
Double click your network, and the following dialog will be displayed:

Enter your WiFi password in the PSK dialog, all the other information will be filled in automatically.
Most home networks use “WPA2-Personal (PSK)” for the authentication and “TKIP” for the encryption. If you know your network uses something else, select that here. Otherwise, leave it at what the software chose for you.
Save and return to the “wpa_gui” window. Click “Connect”. Wait about 10 seconds and the status should update to “Connected” if you entered your network details properly. If it fails, you’ve most likely entered an incorrect password.
Assign a Static IP
Typically, network devices are assigned an IP via a method called Dynamic DHCP. With Dynamic DHCP, the router assigns each device an IP address from a pool of available ones on a first-come-first-served basis. It’s very useful because it allows for seamless network connectivity. However, it also means that the IP is liable to change over time, which will make administering the Raspberry Pi remotely more difficult.
There are two methods for maintaining the same IP across multiple sessions: 1) Static DHCP on the router, or 2) assigning an IP on the device.
The first method is typically easier, prevents duplicate IP address conflicts, and the IP address is assigned to the network card. The second method is typically more difficult, does not prevent IP address conflicts, and the IP address is assigned to the operating system.
You should only perform one of these. We recommend the first method, if you have the ability do to so.
Method 1:
Open LX Terminal.
[nbox type=”notice”]ifconfig wlan0[/nbox]
Notice that zero at the end, not an “o”. Note the line beginning with “inet addr:”. The first set of four numbers if your Pi’s current IP address. Yours is probably similar to “192.168.1.104”, but it may vary a bit.
[nbox type=”notice”]route[/nbox]
Look for the first line not beginning with “default”. This line is typically the IP address of your router. For most home networks, this is the same as the IP above, but with a “1” in the last octet (ex: 192.168.1.1).
Open a browser window using any device connected to your network — your desktop, laptop, cell phone, tablet, or the Pi itself (on the Pi, the default browser is Midori). Type the router’s IP into the navigation bar and hit ‘Enter’. You should be welcomed with a login page.
If you purchased your own router, and you didn’t change the password yourself, it’s probably still set to the default. The default username/password varies from model to model, but you can easily look up the default for your model by typing “default password <modelnumber>” into Google. Often, friends or family will set these up for you, so be sure to ask them if somebody helped set up your network.
If your router is a loaner from your internet service provider (cable, fiber, DSL, or satellite company), then a password has probably already been set for you. Sometimes this is provided with a welcome paperwork packet when you signed up (e.g., Comcast); other times this is not provided unless you call and ask for it (e.g., Time Warner). This device resides on your home network, so you have every right to ask for the login/password. If asked why, tell them you want to set a Static DHCP entry — they may even walk you through it!
The location of the Static DHCP settings varies from model to model. You can find a guide to setting up by going back to our Google trick: search for “setup static dhcp <modelnumber>”. Alternatively, here’s a generic guide.
Give your device an IP address that’s memorable to you. We recommend keeping the first three octets (sets of numbers) in the IP address the same as your router’s IP address.
If you cannot gain access to your router (e.g., on a college campus network), then you can manually assign the IP using the method below.
Method 2:
Open the Debian menu. It’s located in the same place where the Start Menu would be in Windows (bottom left corner of the desktop).
Click “Logout”. Click “Logout” again on the verification dialog.
Once back at the command line, enter the following:
[nbox type="notice"]sudo nano /etc/network/interfaces[/nbox]
Look for the following line:
[nbox type=”notice”]iface default inet dhcp[/nbox]
You’ll need to change that line, and then add a few after it.
[nbox type=”notice”]
iface default inet static
address 192.168.0.86
netmask 255.255.255.0
gateway 192.168.0.1
[/nbox]
“address” is the IP address you want your Pi to have. “netmask” should be left alone unless you know how to subnet. “gateway” is the IP address of your router (see Method 1 to acquire it).
Reboot your Pi
[nbox type="notice"]sudo reboot[/nbox]
Test Your Internet Connection
After rebooting, you will need to log in again, using your new password that you set in the earlier step. Once you log in, you can test your connection by doing the following
[nbox type="notice"]ping -c3 www.google.com[/nbox]
You should see something similar to the information below.
[nbox type="notice"]
64 bytes from gg-in-f147.1e100.net (74.125.134.147): icmp_req=5 ttl=44 time=19.8 ms
64 bytes from gg-in-f147.1e100.net (74.125.134.147): icmp_req=5 ttl=44 time=19.8 ms
64 bytes from gg-in-f147.1e100.net (74.125.134.147): icmp_req=5 ttl=44 time=19.8 ms
[/nbox]
If you see “unknown host” or “timeout”, you are not connected to the internet. Repeat the steps for the method you chose above.
You’re almost out of the weeds! Now it’s time to start installing additional software on your Pi to support Raspberry Pints.
Continue to Step 4: Package Installation.
