
Now that we have the operating system on the Pi, installed and configured, now it’s time for the good stuff. Time to install RPints!
Download the Code
You can perform this step from the Raspberry Pi, a Windows PC or Mac. Choosing to do it from the Raspbery Pi will save time on future steps.
Open a web browser and navigate to https://github.com/RaspberryPints/RaspberryPints. Click the “Releases” button. The most recent version appears at the top. Click “Source Code (zip)” unless you already know that you want a previous version.
Delete the default apache page
This one’s pretty easy. Type:
[nbox type=”notice”]sudo rm /var/www/index.html[/nbox]
If you get an error message stating that the file was not found, you can safely disregard it.
Copy the files
Method 1: Using the Raspberry Pi
If you downloaded with the Raspberry Pi, the default download location is /home/pi. Coincidentally, this is the default location for LX Terminal as well! Open a terminal window and run:
[nbox type=”notice”]unzip RaspberryPints-x.x.x.x.zip (where “x.x.x.x” is the version number you downloaded)[/nbox]
Now we have the files in our home directory, so lets copy them to the web host folder:
[nbox type=”notice”]sudo mv RaspberryPints-x.x.x.x/* /var/www/ (where “x.x.x.x” is the version number you downloaded)[/nbox]
So that we can access and edit the files, we need to open up their permissions:
[nbox type=”notice”]sudo chmod -R 777 /var/www[/nbox]
Might as well clean up the leftover empty folder.
[nbox type=”notice”]rm -R RaspberryPints-x.x.x.x (where “x.x.x.x” is the version number you downloaded)[/nbox]
All done!
Method 2: Using Windows
Navigate to the location that you downloaded the zip file. Extract the zip file. Windows versions XP and older do not have a built-in zip program, so you will need to download one. We recommend 7-Zip.
Download and install WinSCP to your Windows computer, then launch the program.
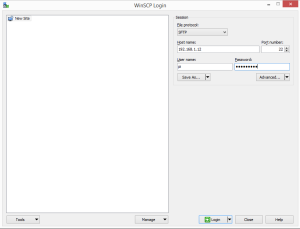
Enter the IP you assigned you Raspberry Pi into the “Hostname” box.
Enter the username “Pi” and the password you assigned it.
If you receive certificate or security notifications, click “Update”.
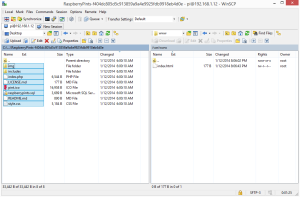
Once WinSCP opens, you should see the two panes:
Navigate the left panel o the directory where you unzipped. Enter the folder. You should see several files, including “index.php” and “pints.ico”.
Navigate to the /var/www directory on the right side. It should be empty.
Select all the files in the left pane and drag them to the right pane to initiate the copy.
On the right pane, go up one folder and right-click the “www” folder, then select “Properties”. In the Permissions section of the box, change the box “Octal” to “0777”. Check the box “Set Group, Owner and Permissions recursively”. Click Ok.
Method 3: Using a Mac
Using a Mac, the steps are very similar to using Windows.
The only major difference is that WinSCP does not run on a Mac. We recommend FileZilla instead.
Conclusion
Now that all the files are copied to the Pi and the permissions are set, it’s time to finalize the installation and get the tap list running!
Continue to Step 7: RPints Configuration.
